


 Login
Login Home → Learn & Support →

Leave Balance Adjustments & Bulk Leave Records
Whether you need to correct a single employee’s entitlement, apply a company-wide policy change, or record a batch of back-dated leave, this guide will show you how — with practical examples, clear rules, and answers to common questions.
What You’ll Be Able to Do
- Adjust individual leave balances in seconds with full audit tracking.
- Upload bulk adjustments from a spreadsheet — ideal for year-end work or migrations.
- Review the complete history of every change, with timestamps and sources.
- Understand when and why the system applies certain rules — so you can explain them to your team.
1. Overview
1.1 What Are Leave Adjustments?
Leave Adjustments let you correct or modify an employee’s leave balance — whether you need to grant extra days, record leave consumed, correct a prior error, or reflect a policy change.
You can adjust:
- Entitlement — the total days granted for the period.
- Entitlement Taken — the days already used.
- Carried Forward — days brought from the previous period.
- Carried Forward Taken — days used from the carry-forward.
The system calculates the Total Balance automatically from these components, so you always work with the underlying values rather than an opaque total.
1.2 Why Component-Level Adjustments Matter
Previously, you could only change the total balance. That worked, but it hid the reason for the change. If your entitlement should have been 25 but was mistakenly set to 20, adjusting the total +5 didn’t tell future readers whether you were crediting Entitlement, reversing a taken day, or cancelling a forfeiture.
With component-level adjustments, the record shows exactly what you changed and why — making audits faster, disputes rarer, and hand-overs clearer.
1.3 Who This Guide Is For
| Role | What You Can Do |
|---|---|
| HR Manager / Payroll Admin (PAC user) | Make adjustments, upload files, review history, edit existing records |
| Employee (ESS user) | View your own history |
| Finance / Approver | Review adjustments during payroll sign-off |
2. Getting Started
2.1 Before You Make Your First Adjustment
Take a moment to check three things. This avoids the most common issues.
- Confirm the payroll period is in Draft status. Adjustments apply only to the period your payroll team is currently preparing. You’ll find the status on your payroll dashboard.
- Identify the right leave type. Annual, Sick, Study and so on each have their own balance. Changes to one do not affect another.
- Know the reason. Every adjustment requires a reason. Write it as you would want to read it a year from now during an audit — specific, dated, and referenceable.
2.2 The Three Ways to Make an Adjustment
Choose the method that fits the job:
| If you need to… | Use this method |
|---|---|
| Adjust one employee | Manual entry |
| Adjust many employees using our template | Template upload |
| Upload a spreadsheet you already have | Free-form upload |
2.3 Navigating to the Feature
You can reach Leave Adjustments from any of two places. They all lead to the same screen — use whichever is closest to where you’re working.
- From the Balances list: Leaves → Balances → select an employee → click the leave type.
- From the employee record: Employees → select employee → Leave tab → Balances.

3. Making a Manual Adjustment
Use this method when you need to correct a single employee’s leave balance. It’s fast, gives you real-time feedback, and is the most common way adjustments are made.
3.1 Step-by-Step
- Open the Balances page and locate the employee.
- Click the relevant leave type (for example, Annual Leave).
- The Adjustment panel opens on the right. You’ll see each component listed, each with an Adjustment field and a Balance field.
- Type a positive or negative number in the Adjustment field. For example, +5 to grant five additional days to Entitlement, or -2 to reduce Entitlement Taken by two days.
- Watch the Balance column update live as you type. This shows exactly what the employee’s balance will be after you save.
- Write your reason in the comment box. This is required *
- Click Save.
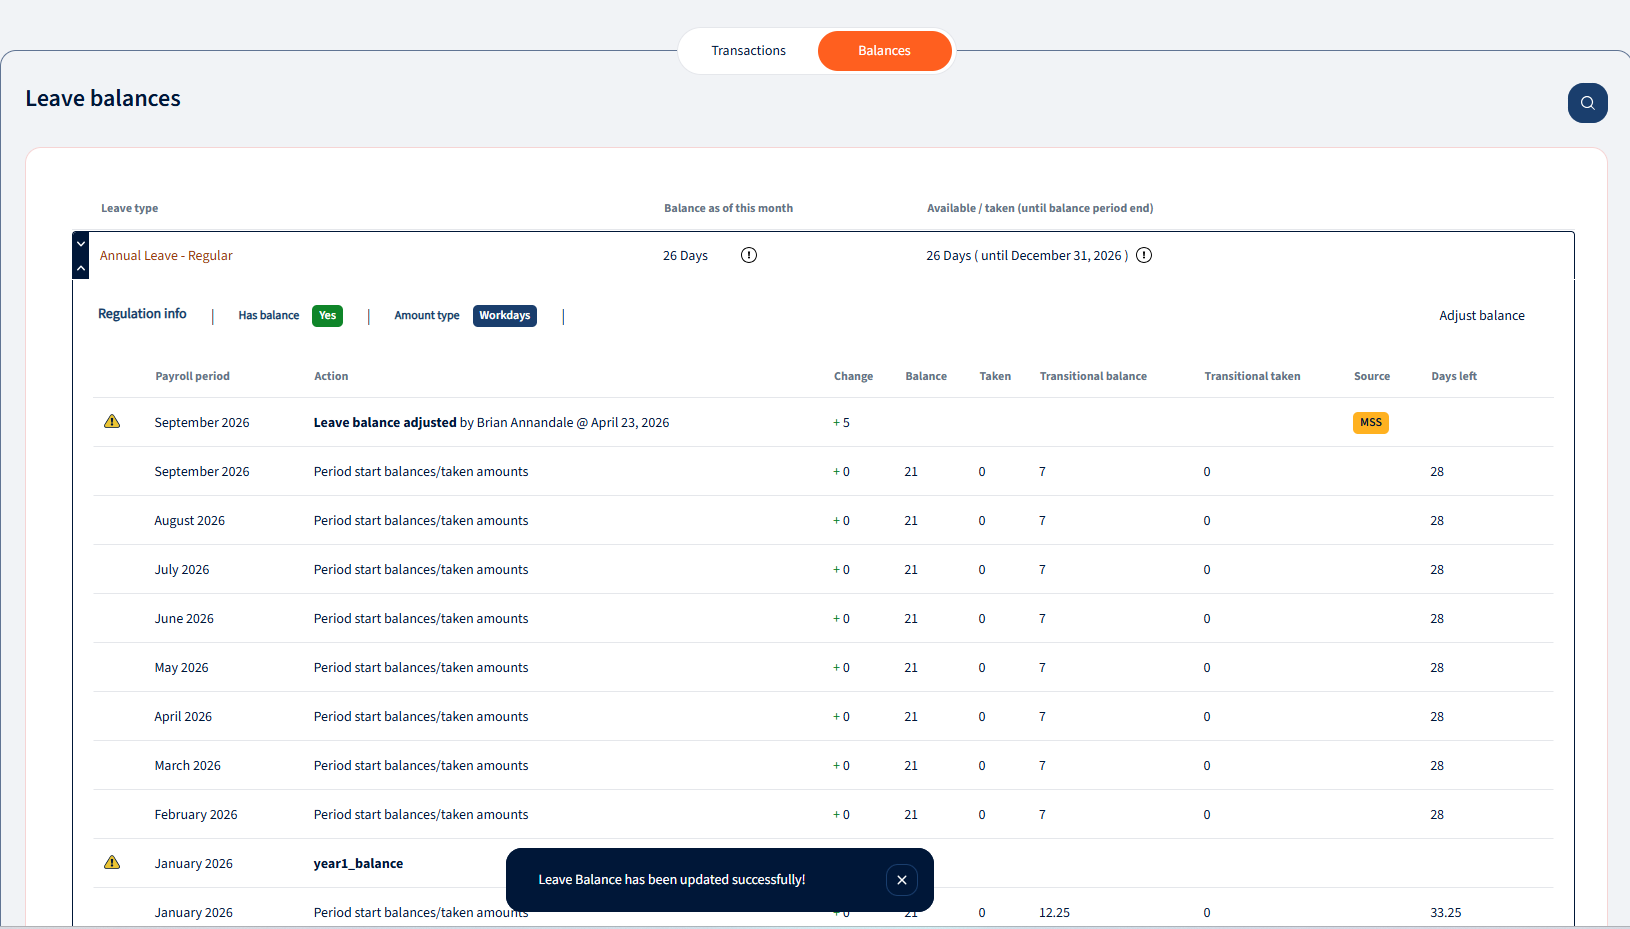
3.2 Working Example — Granting Five Extra Annual Leave Days
Scenario: HR has approved an additional five days of annual leave for an employee, to recognise long service.
- Go to Leaves → Balances. Find the employee.
- Click Annual Leave to open the Adjustment panel.
- In the Entitlement row, enter +5. The Balance updates from 21 days to 26 days live.
- In the reason box, enter: “Long-service recognition per HR approval dated 15-Apr-2026, ref LSR-2026-042.”
- Click Save.

The adjustment is now recorded. You can view it by checking the transactions below.
3.3 Validation Rules — What the System Checks
When you save, the system runs several checks. If any fail, you’ll see a clear message indicated as an error.
3.4 Total Balance Is Read-Only
You’ll notice the Total Balance shown in the panel doesn’t have an Adjustment field. That’s deliberate: Total Balance is always calculated from the individual components. If you want to change it, change the underlying components and the total updates automatically.
3.5 Some Leave Types Can’t Be Manually Adjusted
| ⚠ Formula-Based Leave Types
Certain leave types — for example, maternity leave tied to gender, or childcare leave tied to the number of dependents — are driven by a formula rather than a fixed number. For these, the balance recalculates automatically each period based on the employee’s current details. To change them, update the employee’s underlying details (e.g., dependents, grade, contract) rather than adjusting the balance directly. These adjustments will take affect with the payroll period close. If you attempt a manual adjustment on a formula-based leave type, the system will block it. |
4. Uploading Adjustments from a Spreadsheet
When you need to adjust many employees at once — for year-end corrections, migration from another system, or batch back-dated leave — use the upload feature.
4.1 Opening the Upload Flow
- Go to Leaves → Balances.
- Click the Import icon at the top of the page.
- Choose Template upload or Manual upload when prompted.
Use Template upload if you’re starting fresh — the template gives you the right columns in the right order. Use Manual upload if you have an existing spreadsheet; you’ll map your columns to ours in the next step.
4.2 Two Kinds of Rows, One File
A single spreadsheet can contain two types of rows — Adjustment rows and Leave Taken rows. This lets you, for example, record a correction AND register the actual leave the employee took, in one file.
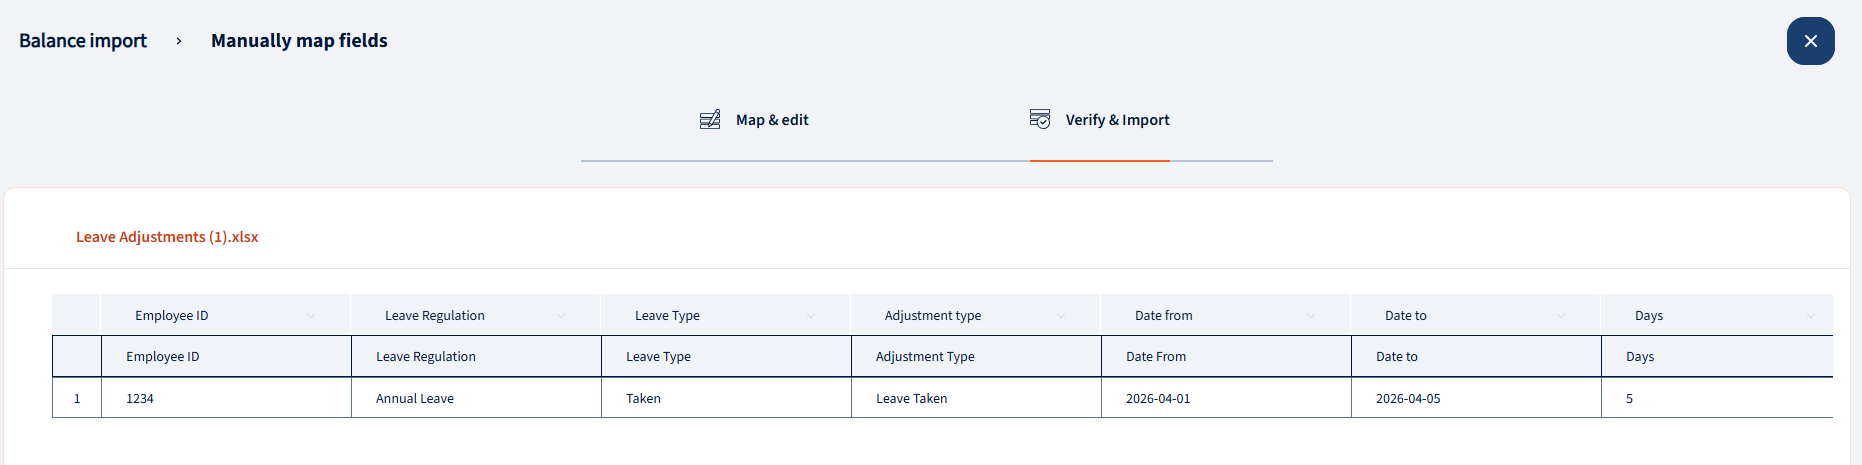
4.2.1 Adjustment Row — Correcting a Component
Use this to change the Entitlement, Carried Forward, or any other component.
| Column | Required? | What to Enter |
|---|---|---|
| Employee Code | Yes | The employee’s unique ID |
| Adjustment / Taken | Yes | The word “Adjustment” |
| Leave Regulation | Yes | The leave type name (exact spelling) |
| Leave Type / Component | Yes | E.g., Entitlement, Carried Forward Taken |
| # days | One of these | A signed number — how many days to add or subtract |
| Date From / Date To | Leave empty | Not used for adjustments |
| Comment | Yes | The reason (cannot be blank) |

4.2.2 Leave Taken Row — Recording Used Days
Use this to register leave an employee has taken, with specific dates.
| Column | Required? | What to Enter |
|---|---|---|
| Employee Code | Yes | The employee’s unique ID |
| Leave Regulation | Yes | The leave type name (exact spelling) |
| Leave Type | Yes | The word “Taken” |
| Adjustment Type | Yes | The words “Leave Taken” |
| Date From | Yes | First day of leave |
| Date To | Yes | Last day of leave |
| # days | Optional | System calculates if blank; enter to override |
| Comment | Yes | The reason |
4.3 How the System Processes Your File
- All Adjustment rows are processed first, regardless of their position in the file.
- Leave Taken rows are processed next, in order of Date From (earliest first).
- If any single row fails validation, the entire file is rejected. No partial commits.
| ℹ Why All-or-Nothing?
Partial uploads would leave you uncertain which rows applied. By rejecting the whole file if any row fails, we make sure your records always reflect a clean, complete set of changes. Fix the flagged rows and re-upload. |
4.4 Upload Errors and How to Fix Them
| Error Message | What It Means | Fix |
|---|---|---|
| Employee not found | The Employee Code doesn’t match anyone in the system | Check for typos, extra spaces, or confirm the employee is active |
| Valid values: [Carried Forward, Entitlement, Taken] | The leave type name doesn’t match any configured type | Check spelling; leave type names are case-sensitive |
| Only numbers are allowed in the Days column | Text, symbols or special characters in a numeric column | Remove anything that isn’t a digit, decimal point or minus sign |
| Comment cannot be empty | A row has no reason | Add a meaningful comment for every row |
| Date From and Date To are required for Leave Taken | Missing dates on a Taken row | Fill in both date columns |
5. Understanding the Incremental Effect
Adjustments apply from the current period onwards — they do not back-fill earlier periods. Here’s a working example.
Suppose the employee has an annual Entitlement of 24 days, accruing 2 per month. In May, you add +5.
| Month | Accrual | Adjustment | Post-Adjustment Balance |
|---|---|---|---|
| January | 2 | 2 | |
| February | 2 | 4 | |
| March | 2 | 6 | |
| April | 2 | 8 | |
| May | 2 | +5 | 15 |
| June | 2 | 17 | |
| November | 2 | 27 | |
| December | 2 | +2 | 31 |
The +5 is absorbed in May and carries forward. Prior months remain unchanged. This protects the historical integrity of your records.

We’re glad. Tell us how this page helped.

We’re sorry. Can you tell us what didn’t work for you?
Newsletter
Simplifying employment tasks worldwide.
Let us help you make sure you’re on the right track. Join 15,000+ subscribers and receive exclusive tips and resources.