
On this page0
Form 138 – Multiple Challan Handling
1. What is being introduced
Until now, when a client paid their monthly TDS through more than one challan, the Form 138 report couldn’t tell which employees belonged to which challan. It simply put every employee into every challan. There was also no reliable way to give the system the actual amounts that were paid, so the report always showed the system’s own calculated figures, even when they were out of date. Both had to be corrected by hand after the report was generated.
This release adds two things that fix that.
A. Choose which employees go into each challan
You can now pick the employees who belong to each challan. You can select them one by one on screen, or upload an Excel list. When you generate the report, each challan shows only the employees you picked. If you don’t pick anyone, the challan includes all employees, exactly as it does today.
B. Upload the actual challan figures
There is a new Challan Data tab where you upload the real, employee-wise challan figures from an Excel file. The system saves them, groups them by Challan Serial Number, and keeps them for later. You can come back to view, change or download them at any time. When you generate the report, the system uses your uploaded figures for Amount Credit and Total Tax Deducted instead of its own calculation. If you haven’t uploaded anything for a challan, the system’s figures are used as before.
In short: the right employees, with the right amounts, in the right challan, with no manual fixing afterwards.
2. How to use this
A. Choose employees for a challan
- Go to Reports → Form 138 and start generating the report.
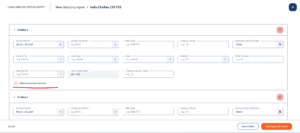
- Go to Step 2 – Challan Details. You’ll see a card for each challan in the month.
- On the challan you want, click “Select employees manually and continue”.
- A full screen opens with two lists:
- Left – Available: employees not yet in this challan
- Right – Selected: employees in this challan
- Add employees in any of these ways:
- Click (+) next to a name to move it to the right.
- Tick the boxes next to several names to move them together.
- Tick the box at the top of a list to select everyone shown.
- Use the filter icon to show only Active, Inactive or Draft employees. The count updates as you filter.
- To take someone out, click (X) next to their name on the right.
- Or upload a list instead:
- Click Upload Excel at the top.
- The file must be .xlsx or .xls with three columns: Employee ID, Employee Name, Pay Group.
- The system moves every matching employee to the right automatically.
- A message tells you how many employees were added. A second message lists any rows it couldn’t match (for example “Row 5: Invalid ID”), so you can fix them and upload again.
- Click Continue to save. Step 2 now shows the number of employees in that challan. Click Cancel if you want to leave without saving.
- Repeat for any other challan, then generate the report. Each challan will contain only its own employees.
B. Upload the actual challan figures
- Open the Challan Data tab.

- Click upload and choose your Excel file (.xlsx or .xls) with the employee-wise challan details.
- The system reads the file and groups the rows by Challan Serial Number automatically.
- Click any Challan Serial Number to see its employees and amounts (Employee ID, Name, Amount, Tax).
- To correct a figure: edit it and click save.
- To keep a copy: download any Challan Serial Number to Excel.
- The data stays saved. You can log out and come back later, and it will still be there.
- Generate the report as usual. For any challan that has uploaded data, the report shows your figures for Amount Credit and Total Tax Deducted.
Using both together
You can use both on the same challan. Upload the figures and map the employees. The report will show only the employees you picked, with the figures you uploaded.
Your response has been submitted — it helps us make these pages better.